• This is default featured slide 1 title

    Go to Blogger edit html and find these sentences.Now replace these sentences with your own descriptions.This theme is Bloggerized by NewBloggerThemes.com.

  • This is default featured slide 2 title

    Go to Blogger edit html and find these sentences.Now replace these sentences with your own descriptions.This theme is Bloggerized by NewBloggerThemes.com.

  • This is default featured slide 3 title

    Go to Blogger edit html and find these sentences.Now replace these sentences with your own descriptions.This theme is Bloggerized by NewBloggerThemes.com.

  • This is default featured slide 4 title

    Go to Blogger edit html and find these sentences.Now replace these sentences with your own descriptions.This theme is Bloggerized by NewBloggerThemes.com.

  • This is default featured slide 5 title

    Go to Blogger edit html and find these sentences.Now replace these sentences with your own descriptions.This theme is Bloggerized by NewBloggerThemes.com.

แสดงบทความที่มีป้ายกำกับ ZABBIX แสดงบทความทั้งหมด

สอนตั้งค่า Grafana to Plot Beautiful Graphs from Zabbix on CentOS 7

Features
Flexible metric editor
Regex-based metric filtering
Client-side data processing functions
Template variables support
Templated dashboards support
Group, host, application or item names can be replaced with a template variable. This allows you to create generic dashboards that can quickly be changed to show stats for a specific cluster, server or application.

Annotations support
Display zabbix events on graphs
Show acknowledges for problems
Triggers panel
Panel for showing Zabbix triggers (like Last 20 issues) with some customizable features.

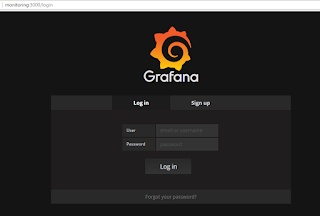
หลังจาก Login เข้าระบบ Grafana ผ่านทาง Link :  http:// ชื่อ หรือ ไอพี :3000
User : Admin
Password : Admin


หลังจากเข้าระบบแล้ว
ให้เปิดใช้งาน Plugin Zabbix

 หลังจากเปิดใช้งาน Plugin Zabbix เรียบร้อยแล้ว
ให้คลิ๊ก Menu ข้างบนตรง Logo ==>> จะมี โลโก้ Zabbix โชว์

ปล.หาไม่มีปลั๊กอิน โชว์ ต้องติดตั้งปลั๊กอินใหม่ โดย ใช้คำสั่งนี้ 
[root@zabbix ~]#  grafana-cli plugins install alexanderzobnin-zabbix-app
[root@zabbix ~]#  systemctl restart grafana-server

เริ่มขั้นตอนการตั้งค่าเพื่อดึงข้อมูลจาก Zabbix
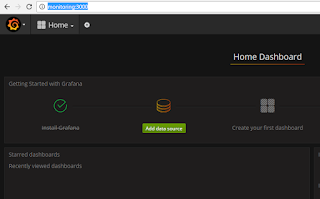
ไปที่หน้า Home หรือ ไปที่หน้า  http:// ชื่อ หรือ ไอพี :3000


เลือก Add data source
User :  ตั้งชื่อ อะไรก็ได้
ติ๊กถูก ที่ Default
Type : Zabbix
Url : http://ไอพี หรือ ชื่อZabbix Server/zabbix/api_jsonrpc.php
Access : direct
User Name :  User Zabbix
Password : Password Zabbix
Trends : ติ๊กถูก
หลังจากนั้น ให้ บันทึก 

ขั้นตอนการตั้งค่าให้ดึงค่าและแสดงกราฟ
ให้ไปที่ Home ==>>Create New

เลือกรูปแบบกราฟ


ให้ คลิ๊ก Panel Title ==> Edit


Graph ==>> General 
Title  คือ ชื่อของ กราฟ


ตั้งค่า Source เพื่อดึงเป็น Report กราฟ


ตัวอย่างทำทำเรียบร้อยแล้ว 


Share:

สอนติดตั้ง Grafana to Plot Beautiful Graphs from Zabbix on CentOS 7

สอนติดตั้ง Grafana เพื่อทำงานร่วมกับ Zabbix Server on CentOS7

    ขั้นตอนที่ 1 
         เพิ่ม Repo ใน CentOS7 โดยไปที่ 
         [root@zabbix ~]# cd /etc/yum.repos.d/
        
        สร้างไฟล์ grafana.repo
        [root@zabbix ~]# vi grafana.repo

        เพิ่มข้อความนี้ในไฟล์ grafana.repo

[grafana]
name=grafana
baseurl=https://packagecloud.io/grafana/stable/el/6/$basearch
repo_gpgcheck=1
enabled=1
gpgcheck=1
gpgkey=https://packagecloud.io/gpg.key https://grafanarel.s3.amazonaws.com/RPM-GPG-KEY-grafana
sslverify=1
sslcacert=/etc/pki/tls/certs/ca-bundle.crt


  เสร็จแล้ว บันทึกแล้วปิด

  [root@zabbix ~]# reboot
  [root@zabbix ~]# yum update -y

   ขั้นตอนที่ 2 เริ่มติดตั้ง Grafana
 
   [root@zabbix ~]#  yum install -y grafana


   ติดตั้ง Grafana Service
   [root@zabbix ~]#  systemctl daemon-reload
   [root@zabbix ~]#  systemctl start grafana-server

   ตรวจสอบว่า Service ทำงานหรือไม่
   [root@zabbix ~]# systemctl status grafana-server

    เปิดให้ Service Grafana-Server ทำงานทุกครั้งที่เปิดเครื่อง
    [root@zabbix ~]#  systemctl enable grafana-server

    เริ่มติดตั้ง Zabbix plugin for Grafana
    [root@zabbix ~]#  grafana-cli plugins install alexanderzobnin-zabbix-app

    [root@zabbix ~]#  systemctl restart grafana-server

    อนุญาติ Port ของ Grafana ที่ Firewall

    [root@localhost~]# firewall-cmd --permanent --add-port=3000/tcp
    [root@localhost~]# firewall-cmd --reload
    [root@localhost~]# systemctl restart httpd

เสร็จสิ้นขั้นตอนการติดตั้ง 

ทดลองเข้าระบบได้ที่ 
http:// ไอพี หรือ ชื่อของ Server :3000 ตามด้วย Port 3000

User :  admin 
Password : admin


Share:

Installation Zabbix Agent on Linux Systems


        Agent installation on Redhat  or CentOS

       Step.1 สำหรับท่านที่ยังไม่มี Source Zabbix ให้ทำการ ติดตั้งตัว Repository ก่อนดังนี้
     [root@zabbix ~]# yum install epel-release
     [root@zabbix ~]# rpm -ivh http://repo.zabbix.com/zabbix/3.2/rhel/7/x86_64/zabbix-release-3.2-1.el7.noarch.rpm
     [root@zabbix ~]# yum update -y

      Step.2 หากทำการติดตั้ง Repository เรียบร้อยแล้วให้ทำการติดตั้ง Zabbix Agent

       [root@zabbix ~]# yum install -y zabbix-agent
     

     หลังจากติดตั้ง Zabbix Agent เรียบร้อยแล้ว ให้ไปแก้ไข Config ของ Zabbix Agent เพื่อชี้ไปยัง Zabbix Server  เพื่อส่งข้อมูล
    [root@zabbix ~]# cd /etc/zabbix/
    ให้แก้ไขไฟล์ที่ชื่อ zabbix_agentd.conf
    [root@zabbix ~]#  vi zabbix_agentd.conf

   แก้ไขมี 3 จุด  คือ
Server = ใส่ IP Address ของ Zabbix Server

ServerActive = ใส่ IP Address ของ Zabbix Server

Hostname = ใส่ชื่อของ Zabbix Server

หลังจากนั้น ให้ บันทึกแล้วปิด

    เริ่ม Start Zabbix Agent 
     [root@zabbix ~]# systemctl start zabbix-agent

    เพื่อให้ Zabbix Agent ทำงานอัตโนมัติหากปิด หรือเปิดเครื่อง
     [root@zabbix ~]# systemctl enable zabbix-agent

เมื่อ Start Zabbix Agent แล้ว   
ขั้นตอนต่อไป ให้เปิด ฟังก์ชั้นที่  Zabbix Server 
ไปที่ Configuration ==>> Hosts ==Enable  ฟังชั่น ตรง Status โดยการคลิ๊ก Disabled เพื่อเปิดฟังก์ชั่น

อย่าลืมไปใส่ชื่อ Server ของ Zabbix ในหน้าของ Hosts ด้วยน่ะ


ผลลัพย์จะออกมาแบบนี้ 
Agent เริ่มทำงาน


Share:

สอนติดตั้ง Zabbix Agent on Windows

หลังจากติดตั้ง Zabbix Server เรียบร้อยแล้ว  ขั้นตอนต่อไปคงคงหนีไม่พ้นการเก็บข้อมูลจากเครื่อง Client เพื่อนำไปประมวลผลและMonitor ในปัจจุบัน คงหนี้ไม่พ้น ระบบปฏิบัติการWindows และ Linux
ในบทความนี้ขอนำเสนอวิธีการติดตั้งตัว Zabbix Agent  บนตัว Client

Step1 Download  Zabbix Agent for Windows
Download ที่นี่ สำหรับ Zabbix Server 4.2.1 
https://www.zabbix.com/download_agents

หากใช้ Zabbix Server เวอร์ชั่นอื่นก็สามารถดาวโหลดได้ที่ลิงค์นี้ https://www.zabbix.com/download_agents
Share:

เตือนคุณด้วย Line Alert ด้วยภาษา Python3 กับ ระบบ Zabbix

ในปัจจุบันคงไม่มีใครปฏิเสธว่า Line มีความจำกับชีวิตประจำวัน รองจาก Facebook
ฉนั้น หากเรานำ Line ซึ่ง Active กับผู้ใช้ในชีวิตประจำวัน มาใช้กับงานหรือธุรกิจคงจะเป็นการดี
เพราะบางระบบ

Step.1 Generat Token
https://notify-bot.line.me/my/

Login ด้วยอีเมล์ ที่Register กับ Line ( อีเมล์ที่ใช้เล่นLine ใน คอม )

คลิ๊ก ตรงโปรไฟล์ ==> เลือก หน้าบัญชี ==>
คลิ๊ก ==>> ออก Token


โปรดใส่ชื่อ Token (จะแสดงเมื่อมีการแจ้งเตือน) : ใส่ชื่อ Line ที่เตือน
 โปรดเลือกห้องแชทที่ต้องการส่งข้อความแจ้งเตือน : เลือกกลุ่ม หรือ บุคคลที่ต้องการแจ้ง

หลังจากนั้นกด ออก Token 
หากได้ Token ให้ คัดลอกเพื่อเตรียมไปใส่ใน Script

ปล. อย่าลืมแอดเป็นเพื่อกับ Line Notify  และเชิญเข้ากลุ่มที่ต้องการเตือนด้วย

Step.2 Install Module Python
#yum install -y python34-setuptools
#yum install -y python34-pip
#yum install -y python34-requests

Step.3 สร้างไฟล์ สคริ๊ปใช้คำสั่งนี้ในเครื่อง Zabbix Server 
# vi /usr/lib/zabbix/alertscripts/line_script.py

Step.4 วางสคริ๊ปนี้ ไว้ใน line_script.py

#!/usr/bin/python3
import requests
import json
import urllib.parse
import sys
msgzbx = sys.argv
LINE_ACCESS_TOKEN="ใส่ Token ที่ท่านได้ Generat ไว้ที่นี่"
url = "https://notify-api.line.me/api/notify"
message = msgzbx[2]+msgzbx[3]
msg = urllib.parse.urlencode({"message":message})
LINE_HEADERS = {'Content-Type':'application/x-www-form-urlencoded',"Authorization":"Bearer "+LINE_ACCESS_TOKEN}
session = requests.Session()
a=session.post(url, headers=LINE_HEADERS, data=msg)
print(a.text)


Step.5 ทดสอบ Script Python3 ว่าสามารถใช้งานได้ใหม ใช้คำสั่งนี้ 
# cd /usr/lib/zabbix/alertscripts/
/usr/lib/zabbix/alertscripts# python3 สคริ๊ปที่ได้เขียน  ข้อความ1 ข้อความ2 ข้อความ3
/usr/lib/zabbix/alertscripts# python3 line_script.py test1 test2  test3


Step.6 สร้างไฟล์ Media ใหม่ขึ้นมาตามใจชอบ ตัวอย่างเช่น LINE_Alert

1. Administrattion
2. Media types
3. Create media type

Name : ชื่อMedia ชื่ออะไรก็ได้
Type :  Script
Script name : ชื่อ สคริ๊ป ที่ได้สร้างไว้ก่อนหน้านี้
Script parameters : {ALERT.SENDTO}
                               {ALERT.SUBJECT}
                               {ALERT.MESSAGE}
Enabled : ติ๊กถูก


Step.7 เริ่มตั้งค่าให้ Line Notify ทำงาน ตามเงื่อนไข
1.  Configuration ==> Action


Name : ชื่อของ Action
Type of calculation : เงื่อนไขการทำงาน
Conditions : กฏของการทำงาน
New condition : เลือกเงื่อนไข หลังจากนั้นให้กด Add
Enabled : ติ๊กถูกเพื่อเปิดการใช้งาน


Default subject : ชื่อหัวข้อ ข้อความ
ตัวอย่าง 
{TRIGGER.STATUS}: {TRIGGER.NAME}

Default message : ข้อความที่จะแจ้ง
ตัวอย่าง
HOST : {HOST.HOST}
IP Adress : {HOST.CONN}
Trigger: {TRIGGER.NAME}
Trigger status: {TRIGGER.STATUS}
Trigger severity: {TRIGGER.SEVERITY}


Original event ID: {EVENT.ID}

Operation type : send message
Send to User groups : ส่งเป็นกลุ่ม
Send to Users : ส่งเป็นรายคน
Send only to : เลือก Media Line ที่ได้สร้างก่อนหน้านี้ 
หลังจากนั้น ให้กด Add  และ Update 

Action ==>> Recovery operations
จะแจ้งเตือนเมื่อระบบทำงานได้ปรกติ

Default subject : ชื่อหัวข้อ ข้อความ
ตัวอย่าง 
{TRIGGER.STATUS}: {TRIGGER.NAME}

Default message : ข้อความที่จะแจ้ง
ตัวอย่าง
HOST : {HOST.HOST}
IP Adress : {HOST.CONN}
Trigger: {TRIGGER.NAME}
Trigger status: {TRIGGER.STATUS}
Trigger severity: {TRIGGER.SEVERITY}


Original event ID: {EVENT.ID}

Operations : ให้ส่งไปที่ใครบ้าง

หลังจากนั้นก็กด Update

ลิงค์ Macro สำหรับเลือกคำสั่ง 
https://www.zabbix.com/documentation/3.2/manual/appendix/macros/supported_by_location

เรียบร้อย


ติดต่อหรือแนะนำ ได้ที่นี่
E-Mail : Abdulloh.eg@gmail.com
Line : Muslimeen

Share:

How to Zabbix and Basic Installation EP.1


How to Zabbix and Basic Installation  EP.1
มาทำความรู้จักZabbix  และมาทำรู้จักการติดตั้ง Zabbix เบื้องต้น เทปที่ 1

ติดต่อหรือแนะนำ ได้ที่นี่
E-Mail : Abdulloh.eg@gmail.com
Line : Muslimeen

Share:

วิธีติดตั้ง ZABBIX 3.2 on Ubuntu 14.04 LTS

ขั้นตอนการติดตั้ง ZABBIX 3.2 บนระบบปฏิบัติการ Ubuntu 14.04 LTS


1. หลังเปิดครื่อง Server สำหรับทำ ZABBIX แล้ว ให้ทำการ Login เป็นสิทธิของ Root 
2.  # cd /tmp
3.   # wget http://repo.zabbix.com/zabbix/3.2/ubuntu/pool/main/z/zabbix-release/zabbix-release_3.2-1+trusty_all.deb

4.  #  dpkg -i zabbix-release_3.2-1+trusty_all.deb
5.  #  apt-get update
6. # reboot

Installing packages

Example for Zabbix server and web frontend with MySQL database.
# apt-get install zabbix-server-mysql zabbix-frontend-php

Creating initial database

# zcat /usr/share/doc/zabbix-server-mysql/create.sql.gz | mysql -uroot -p Password
รหัสผ่านของ ฐานข้อมูล

Starting Zabbix server process

After database is installed and zabbix_server.conf 
# service zabbix-server start

Database configuration for Zabbix server

Edit server host, name, user and password in zabbix_server.conf
# vi /etc/zabbix/zabbix_server.conf
DBHost=localhost
DBName=zabbix
DBUser=zabbix
DBPassword=zabbix

PHP configuration for Zabbix frontend

Apache configuration file for Zabbix frontend is located in /etc/httpd/conf.d/zabbix.conf. Some PHP settings are already configured.
php_value max_execution_time 300
php_value memory_limit 128M
php_value post_max_size 16M
php_value upload_max_filesize 2M
php_value max_input_time 300
php_value always_populate_raw_post_data -1
# php_value date.timezone Asia/Bangkok
หลังจากติดตั้งเรียบร้อย ให้ ทำการ Reboot Server , Restart  Service 
# service zabbix-server start
และ  Restart Service 
# service apache2 restart
เข้าสู่ระบบ
http://ชื่อServer/IP Address /zabbix

หลังจาก Install เรียบร้อยแล้ว   
User Password Default
User: Admin   Password : zabbix

Chang Password Admin after login 

ลิงค์ดาวโหลด http://www.zabbix.com/download.php

ติดต่อหรือแนะนำ ได้ที่นี่
E-Mail : Abdulloh.eg@gmail.com
Line : Muslimeen


Share:

ค้นหาบล็อกนี้

ขับเคลื่อนโดย Blogger.

ผู้ให้ข้อมูลร่วมกัน

Recent Posts

Unordered List

  • Lorem ipsum dolor sit amet, consectetuer adipiscing elit.
  • Aliquam tincidunt mauris eu risus.
  • Vestibulum auctor dapibus neque.

Pages

Theme Support

Need our help to upload or customize this blogger template? Contact me with details about the theme customization you need.