• This is default featured slide 1 title

    Go to Blogger edit html and find these sentences.Now replace these sentences with your own descriptions.This theme is Bloggerized by NewBloggerThemes.com.

  • This is default featured slide 2 title

    Go to Blogger edit html and find these sentences.Now replace these sentences with your own descriptions.This theme is Bloggerized by NewBloggerThemes.com.

  • This is default featured slide 3 title

    Go to Blogger edit html and find these sentences.Now replace these sentences with your own descriptions.This theme is Bloggerized by NewBloggerThemes.com.

  • This is default featured slide 4 title

    Go to Blogger edit html and find these sentences.Now replace these sentences with your own descriptions.This theme is Bloggerized by NewBloggerThemes.com.

  • This is default featured slide 5 title

    Go to Blogger edit html and find these sentences.Now replace these sentences with your own descriptions.This theme is Bloggerized by NewBloggerThemes.com.

แสดงบทความที่มีป้ายกำกับ centos แสดงบทความทั้งหมด

Installation Zabbix Agent on Linux Systems


        Agent installation on Redhat  or CentOS

       Step.1 สำหรับท่านที่ยังไม่มี Source Zabbix ให้ทำการ ติดตั้งตัว Repository ก่อนดังนี้
     [root@zabbix ~]# yum install epel-release
     [root@zabbix ~]# rpm -ivh http://repo.zabbix.com/zabbix/3.2/rhel/7/x86_64/zabbix-release-3.2-1.el7.noarch.rpm
     [root@zabbix ~]# yum update -y

      Step.2 หากทำการติดตั้ง Repository เรียบร้อยแล้วให้ทำการติดตั้ง Zabbix Agent

       [root@zabbix ~]# yum install -y zabbix-agent
     

     หลังจากติดตั้ง Zabbix Agent เรียบร้อยแล้ว ให้ไปแก้ไข Config ของ Zabbix Agent เพื่อชี้ไปยัง Zabbix Server  เพื่อส่งข้อมูล
    [root@zabbix ~]# cd /etc/zabbix/
    ให้แก้ไขไฟล์ที่ชื่อ zabbix_agentd.conf
    [root@zabbix ~]#  vi zabbix_agentd.conf

   แก้ไขมี 3 จุด  คือ
Server = ใส่ IP Address ของ Zabbix Server

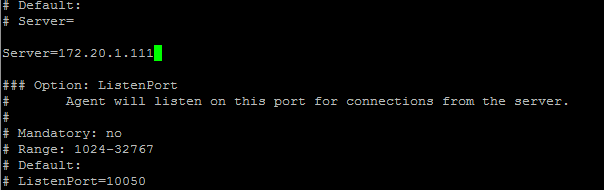
ServerActive = ใส่ IP Address ของ Zabbix Server

Hostname = ใส่ชื่อของ Zabbix Server

หลังจากนั้น ให้ บันทึกแล้วปิด

    เริ่ม Start Zabbix Agent 
     [root@zabbix ~]# systemctl start zabbix-agent

    เพื่อให้ Zabbix Agent ทำงานอัตโนมัติหากปิด หรือเปิดเครื่อง
     [root@zabbix ~]# systemctl enable zabbix-agent

เมื่อ Start Zabbix Agent แล้ว   
ขั้นตอนต่อไป ให้เปิด ฟังก์ชั้นที่  Zabbix Server 
ไปที่ Configuration ==>> Hosts ==Enable  ฟังชั่น ตรง Status โดยการคลิ๊ก Disabled เพื่อเปิดฟังก์ชั่น

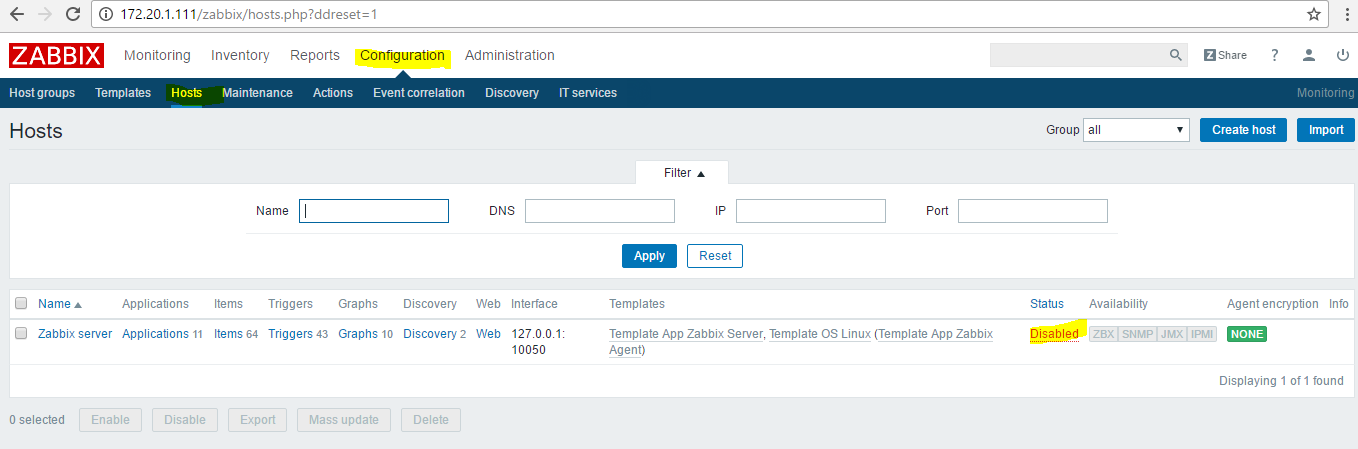
อย่าลืมไปใส่ชื่อ Server ของ Zabbix ในหน้าของ Hosts ด้วยน่ะ


ผลลัพย์จะออกมาแบบนี้ 
Agent เริ่มทำงาน


Share:

สอน Install FreeRadius on CentOS6.8

Pending.....
Share:

สอนติดตั้งโปรแกรมตรวจสอบสเป็คคอมพิวเตอร์ OpenAudit


วิดีโอสอนติดตั้งโปรแกรมตรวจสอบและเก็บข้อมูลต่างๆ เช่นสเป็ค
 รายละเอียด Software ที่ใช้  และอื่นๆ ในคอมพิวเตอร์
Software นี้เป็น OpenSource ซึ่งเป็น Program Free  
และการติดตั้งในวันนี้จะรับบน CentOS7 
รายละเอียดมีดังนี้
1.Intro
2.Demo 
3.install and config on CentOS7
4.Test Program after instalation
5.Detail function program

Download file Present : https://goo.gl/iRIU4K

Thank You  seeing VDO 

Please subscribe Chanel

Youtube : สารพัน โปรแกรม

ติดต่อหรือแนะนำ ได้ที่นี่
E-Mail : Abdulloh.eg@gmail.com
Line : Muslimeen

Share:

ค้นหาบล็อกนี้

ขับเคลื่อนโดย Blogger.

ผู้ให้ข้อมูลร่วมกัน

Recent Posts

Unordered List

  • Lorem ipsum dolor sit amet, consectetuer adipiscing elit.
  • Aliquam tincidunt mauris eu risus.
  • Vestibulum auctor dapibus neque.

Pages

Theme Support

Need our help to upload or customize this blogger template? Contact me with details about the theme customization you need.