• This is default featured slide 1 title

    Go to Blogger edit html and find these sentences.Now replace these sentences with your own descriptions.This theme is Bloggerized by NewBloggerThemes.com.

  • This is default featured slide 2 title

    Go to Blogger edit html and find these sentences.Now replace these sentences with your own descriptions.This theme is Bloggerized by NewBloggerThemes.com.

  • This is default featured slide 3 title

    Go to Blogger edit html and find these sentences.Now replace these sentences with your own descriptions.This theme is Bloggerized by NewBloggerThemes.com.

  • This is default featured slide 4 title

    Go to Blogger edit html and find these sentences.Now replace these sentences with your own descriptions.This theme is Bloggerized by NewBloggerThemes.com.

  • This is default featured slide 5 title

    Go to Blogger edit html and find these sentences.Now replace these sentences with your own descriptions.This theme is Bloggerized by NewBloggerThemes.com.

แสดงบทความที่มีป้ายกำกับ Linux Server แสดงบทความทั้งหมด

Installation Zabbix Agent on Linux Systems


        Agent installation on Redhat  or CentOS

       Step.1 สำหรับท่านที่ยังไม่มี Source Zabbix ให้ทำการ ติดตั้งตัว Repository ก่อนดังนี้
     [root@zabbix ~]# yum install epel-release
     [root@zabbix ~]# rpm -ivh http://repo.zabbix.com/zabbix/3.2/rhel/7/x86_64/zabbix-release-3.2-1.el7.noarch.rpm
     [root@zabbix ~]# yum update -y

      Step.2 หากทำการติดตั้ง Repository เรียบร้อยแล้วให้ทำการติดตั้ง Zabbix Agent

       [root@zabbix ~]# yum install -y zabbix-agent
     

     หลังจากติดตั้ง Zabbix Agent เรียบร้อยแล้ว ให้ไปแก้ไข Config ของ Zabbix Agent เพื่อชี้ไปยัง Zabbix Server  เพื่อส่งข้อมูล
    [root@zabbix ~]# cd /etc/zabbix/
    ให้แก้ไขไฟล์ที่ชื่อ zabbix_agentd.conf
    [root@zabbix ~]#  vi zabbix_agentd.conf

   แก้ไขมี 3 จุด  คือ
Server = ใส่ IP Address ของ Zabbix Server

ServerActive = ใส่ IP Address ของ Zabbix Server

Hostname = ใส่ชื่อของ Zabbix Server

หลังจากนั้น ให้ บันทึกแล้วปิด

    เริ่ม Start Zabbix Agent 
     [root@zabbix ~]# systemctl start zabbix-agent

    เพื่อให้ Zabbix Agent ทำงานอัตโนมัติหากปิด หรือเปิดเครื่อง
     [root@zabbix ~]# systemctl enable zabbix-agent

เมื่อ Start Zabbix Agent แล้ว   
ขั้นตอนต่อไป ให้เปิด ฟังก์ชั้นที่  Zabbix Server 
ไปที่ Configuration ==>> Hosts ==Enable  ฟังชั่น ตรง Status โดยการคลิ๊ก Disabled เพื่อเปิดฟังก์ชั่น

อย่าลืมไปใส่ชื่อ Server ของ Zabbix ในหน้าของ Hosts ด้วยน่ะ


ผลลัพย์จะออกมาแบบนี้ 
Agent เริ่มทำงาน


Share:

Install Web Server and PHP7 on CentOS7

Step.1 : Install Web Server on CentOS7


หลังจากติดตั้ง CentOS7 เรียบร้อยแล้ว ให้ทำขั้นตอนดังนี้
[root@localhost~]# yum update -y

หลังจาก อัพเดตOS แล้ว   ให้ติดตั้ง Web Server ได้เลย
[root@localhost~]# yum install -y httpd


เมื่อติดตั้ง เรียบร้อย ให้ทำการ อนุญาติ Port80 and Service http , https

[root@localhost~]# firewall-cmd --permanent --add-port=80/tcp
[root@localhost~]# firewall-cmd --permanent --add-service=http
[root@localhost~]# firewall-cmd --permanent --add-service=https
[root@localhost~]# firewall-cmd --reload
[root@localhost~]# systemctl start httpd
[root@localhost~]#ifconfig 
เมื่อทราบ IP Address  แล้ว ให้เปิด Browser  แล้วพิมพ์ URL   
http://ตามด้วยหมายเลขIP Address เครื่อง 


หลังจากนั้นให้ Start Service ของเว็บไซต์ 

[root@localhost~]#systemctl start httpd
ปล.หากเกิด Error แบบนี้ 
ให้ทำการปิด selinux ก่อน ครับ  ให้ทำดังนี้ 
[root@localhost~]# vi /etc/sysconfig/selinux
ให้แก้ไข ตรง SELINUX=enforcing   ให้เปลี่ยนเป็น SELINUX=disabled
หลังจากนั้น บันทึกแล้วปิด

[root@localhost~]#reboot

Step2 : Install PHP7 on CentOS7

ติดตั้ง Epel and  Install PHP7

[root@localhost~]# yum install -y epel-release
[root@localhost~]# rpm -Uvh https://mirror.webtatic.com/yum/el7/webtatic-release.rpm
[root@localhost~]# yum update -y
[root@localhost~]# yum install -y php70w
[root@localhost~]# yum install -y php70w-opcache php70w-xml php70w-soap php70w-xmlrpc php70w-mbstring php70w-json php70w-gd php70w-mcrypt

ตรวจสอบ Version PHP

[root@localhost~]# php -v

[root@localhost~]# systemctl restart httpd

สร้างไฟล์ PHP เพื่อทดสอบ ว่า PHP สามารถทำงานได้หรือไม่

[root@localhost~]# vi /var/www/html/info.php

ให้ใส่ข้อความดังนี้ 
<?php 
phpinfo(); 
?>
แล้วบันทึก ปิด

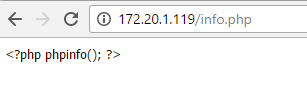
ทดสอบการทำงานของ php
ไปที่ Browser  พิมพ์ 
http://ตามด้วย หมายเลขไอพี / ตามด้วยไฟล์ PHP ที่สร้าง
ตัวอย่าง http://172.201.119/info.php

ภาพแสดงถึงการทำงานของ Host และ PHP7 ได้สมบูรณ์


ในกรณี PHP ไม่ทำงาน


Share:

แจ้งเตือนเมื่อมีคนแอบเข้า Server เรา แจ้งมาที่ Line ( For Linux Server )

คู่มือสอนติดตั้งระบบแจ้งเตือนผ่านไลน์ เมื่อ มีบุคคล Remote ไปยัง Server ของเรา ได้
ผ่านระบบไลน์  ได้ทั้ง Line Group and Line Personal
ในนี้จะสอนกับระบบ Linux CentOS7
สำหรับท่านที่ยังไม่ได้มีบัญชี Line Notify ให้ไปสมัครได้ที่นี้
https://notify-bot.line.me  โดย Login ผ่าน Line Account  ที่ลงทะเบียนด้วย E-Mail เท่านั้น
หลังจากLogin แล้วจะได้ Line Token


====== Login Server by CentOS7 ===
[root@localhost ssh]# vi /root/.bash_profile
# .bash_profile

# Get the aliases and functions
if [ -f ~/.bashrc ]; then
        . ~/.bashrc
fi

# User specific environment and startup programs
curl -X POST -H 'Authorization: Bearer LINE-TOKENของเราครับ' -F 'message=ข้อความที่ต้องการให้ส่ง' https://notify-api.line.me/api/notify

PATH=$PATH:$HOME/bin
export PATH
:wq
[root@localhost ssh]#

Share:

ค้นหาบล็อกนี้

ขับเคลื่อนโดย Blogger.

ผู้ให้ข้อมูลร่วมกัน

Recent Posts

Unordered List

  • Lorem ipsum dolor sit amet, consectetuer adipiscing elit.
  • Aliquam tincidunt mauris eu risus.
  • Vestibulum auctor dapibus neque.

Pages

Theme Support

Need our help to upload or customize this blogger template? Contact me with details about the theme customization you need.