ในปัจจุบันคงไม่มีใครปฏิเสธว่า Line มีความจำกับชีวิตประจำวัน รองจาก Facebook
ฉนั้น หากเรานำ Line ซึ่ง Active กับผู้ใช้ในชีวิตประจำวัน มาใช้กับงานหรือธุรกิจคงจะเป็นการดี
เพราะบางระบบ
Step.1 Generat Token
https://notify-bot.line.me/my/
Login ด้วยอีเมล์ ที่Register กับ Line ( อีเมล์ที่ใช้เล่นLine ใน คอม )
คลิ๊ก ตรงโปรไฟล์ ==> เลือก หน้าบัญชี ==>
คลิ๊ก ==>> ออก Token
โปรดใส่ชื่อ Token (จะแสดงเมื่อมีการแจ้งเตือน) : ใส่ชื่อ Line ที่เตือน
โปรดเลือกห้องแชทที่ต้องการส่งข้อความแจ้งเตือน : เลือกกลุ่ม หรือ บุคคลที่ต้องการแจ้ง
หลังจากนั้นกด ออก Token
หากได้ Token ให้ คัดลอกเพื่อเตรียมไปใส่ใน Script
ปล. อย่าลืมแอดเป็นเพื่อกับ Line Notify และเชิญเข้ากลุ่มที่ต้องการเตือนด้วย
Step.2 Install Module Python
#yum install -y python34-setuptools
#yum install -y python34-pip
#yum install -y python34-requests
Step.3 สร้างไฟล์ สคริ๊ปใช้คำสั่งนี้ในเครื่อง Zabbix Server
# vi /usr/lib/zabbix/alertscripts/line_script.py
Step.4 วางสคริ๊ปนี้ ไว้ใน line_script.py
#!/usr/bin/python3
import requests
import json
import urllib.parse
import sys
msgzbx = sys.argv
LINE_ACCESS_TOKEN="ใส่ Token ที่ท่านได้ Generat ไว้ที่นี่"
url = "https://notify-api.line.me/api/notify"
message = msgzbx[2]+msgzbx[3]
msg = urllib.parse.urlencode({"message":message})
LINE_HEADERS = {'Content-Type':'application/x-www-form-urlencoded',"Authorization":"Bearer "+LINE_ACCESS_TOKEN}
session = requests.Session()
a=session.post(url, headers=LINE_HEADERS, data=msg)
print(a.text)
Step.5 ทดสอบ Script Python3 ว่าสามารถใช้งานได้ใหม ใช้คำสั่งนี้
# cd /usr/lib/zabbix/alertscripts/
/usr/lib/zabbix/alertscripts# python3 สคริ๊ปที่ได้เขียน ข้อความ1 ข้อความ2 ข้อความ3
/usr/lib/zabbix/alertscripts# python3 line_script.py test1 test2 test3
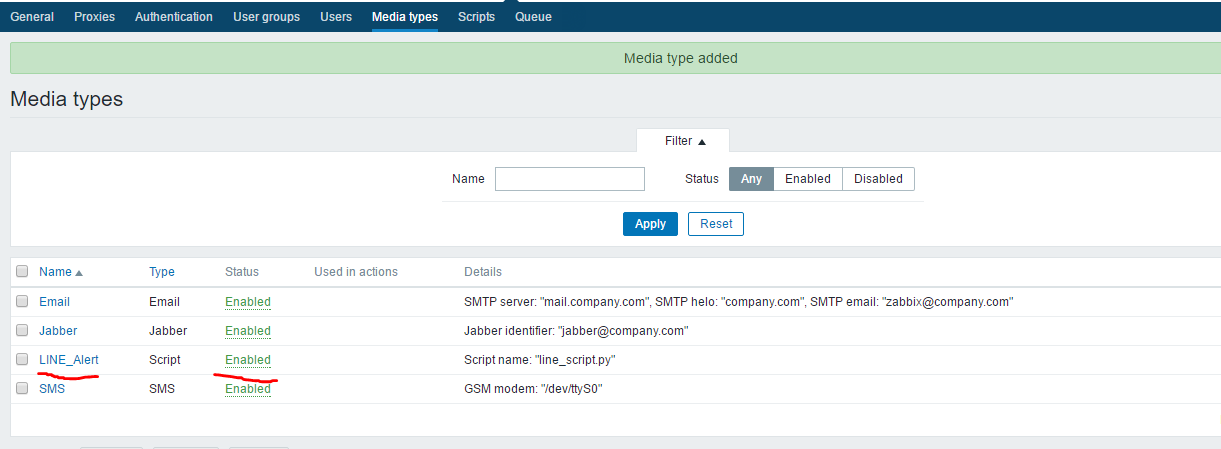
Step.6 สร้างไฟล์ Media ใหม่ขึ้นมาตามใจชอบ ตัวอย่างเช่น LINE_Alert
1. Administrattion
2. Media types
3. Create media type
Name : ชื่อMedia ชื่ออะไรก็ได้
Type : Script
Script name : ชื่อ สคริ๊ป ที่ได้สร้างไว้ก่อนหน้านี้
Script parameters : {ALERT.SENDTO}
{ALERT.SUBJECT}
{ALERT.MESSAGE}
Enabled : ติ๊กถูก
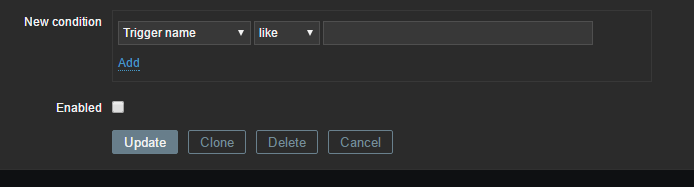
Step.7 เริ่มตั้งค่าให้ Line Notify ทำงาน ตามเงื่อนไข
1. Configuration ==> Action
Name : ชื่อของ Action
Type of calculation : เงื่อนไขการทำงาน
Conditions : กฏของการทำงาน
New condition : เลือกเงื่อนไข หลังจากนั้นให้กด Add
Enabled : ติ๊กถูกเพื่อเปิดการใช้งาน
Default subject : ชื่อหัวข้อ ข้อความ
ตัวอย่าง
{TRIGGER.STATUS}: {TRIGGER.NAME}
Default message : ข้อความที่จะแจ้ง
ตัวอย่าง
HOST : {HOST.HOST}
IP Adress : {HOST.CONN}
Trigger: {TRIGGER.NAME}
Trigger status: {TRIGGER.STATUS}
Trigger severity: {TRIGGER.SEVERITY}
Original event ID: {EVENT.ID}
Operation type : send message
Send to User groups : ส่งเป็นกลุ่ม
Send to Users : ส่งเป็นรายคน
Send only to : เลือก Media Line ที่ได้สร้างก่อนหน้านี้
หลังจากนั้น ให้กด Add และ Update
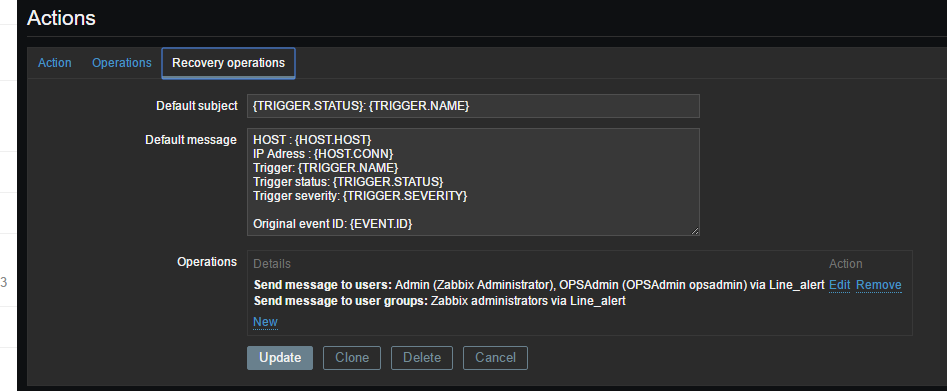
Action ==>> Recovery operations
จะแจ้งเตือนเมื่อระบบทำงานได้ปรกติ
Default subject : ชื่อหัวข้อ ข้อความ
ตัวอย่าง
{TRIGGER.STATUS}: {TRIGGER.NAME}
Default message : ข้อความที่จะแจ้ง
ตัวอย่าง
HOST : {HOST.HOST}
IP Adress : {HOST.CONN}
Trigger: {TRIGGER.NAME}
Trigger status: {TRIGGER.STATUS}
Trigger severity: {TRIGGER.SEVERITY}
Original event ID: {EVENT.ID}
Operations : ให้ส่งไปที่ใครบ้าง
หลังจากนั้นก็กด Update
ลิงค์ Macro สำหรับเลือกคำสั่ง
https://www.zabbix.com/documentation/3.2/manual/appendix/macros/supported_by_location
เรียบร้อย
ติดต่อหรือแนะนำ ได้ที่นี่
E-Mail : Abdulloh.eg@gmail.com
Line : Muslimeen